
Our Recipe for Developing Good Automated Tests
Testing a new version of an application prior to release is non-negotiable. With every release, there is the possibility of introducing bugs. New features must be tested, but existing functionality (regression testing) should be tested as well to be sure that issues were not introduced when new features were added. With each new release, new test cases (unit/functional) are added to your test suite. The bigger the test suite, the more time-consuming regression testing becomes. Eventually, your QA team becomes swamped with hundreds of manual tests. This delays releases and slows down product development
Written by Anton Oboleninov and Edited by Roman Gorbil
Testing a new version of an application prior to release is non-negotiable. With every release, there is the possibility of introducing bugs. New features must be tested, but existing functionality (regression testing) should be tested as well to be sure that issues were not introduced when new features were added. With each new release, new test cases (unit/functional) are added to your test suite. The bigger the test suite, the more time-consuming regression testing becomes. Eventually, your QA team becomes swamped with hundreds of manual tests. This delays releases and slows down product development.
One option is to reduce the number of tests run prior to release. Often a “Smoke Test” or Selective Test will be run just to ensure there are no obvious issues with core functionality. Obviously this has a serious downside in that if all tests are not run, a problem could slip by into the production release. Over time it becomes very difficult to run E2E testing prior to every release, simply because the testing process will take too long.
The answer of course, is Automated Testing. With automated testing, a large number of tests can be completed in a short period of time. This allows for the completion of a full E2E system test prior to the release of each new version of the application. But automation isn’t magic, it requires engineering. Building a reliable, maintainable automated test suite takes effort, planning, and the right tools. Here’s how we built ours.
Choosing Which Tests to Automate
Our QA goal is simple: make sure the app works as expected and meets client requirements. To do that, we need reliable, repeatable test cases for the entire system.
We chose Integration Regression Testing as the starting point for our automated tests. This process of manually testing the integration between client and server components was incredibly time-consuming and had a high risk of regressions, which made it the perfect testing ground to save time.
Our Stack: PyTest, Selenium, and Qase.io
Why Pytest?
Because Python is one of the most popular languages for automated testing and we have an experienced team of Python developers. Pytest has a simple and clear syntax and many plugins that facilitate testing, making it a perfect fit for our team.
Why Selenium?
We chose the Selenium framework for interacting with a browser. Selenium provides APIs in various programming languages, including Python which fit into our process nicely.
As an alternative to Selenium, we considered the increasingly popular Playwright, but ultimately decided it wasn’t the best fit for our process. We found Playwright is great for getting started quickly with automated tests or automating a small amount of tests. However, when using Playwright for more complex interfaces, you need to develop additional interaction classes; these add another layer between the tests and the browser. Additionally, Playwright auto-generates Python code, which complicates debugging. Also one of our future goals is to set up test automation for mobile apps, and Playwright is only starting to support it.
Other Tools
We already had a well-established process for documenting testing using Qase.io and had a decent pool of test cases that only needed to be automated.
Page Object Model: The Foundation
The modern standard for designing automated testing systems is to use Page Object Models. In a nutshell, Page Object Models involve separating application interaction logic from test logic. All operations with pages are concentrated in the classes for these pages. Tests only use the methods for the pages affected by the tests.
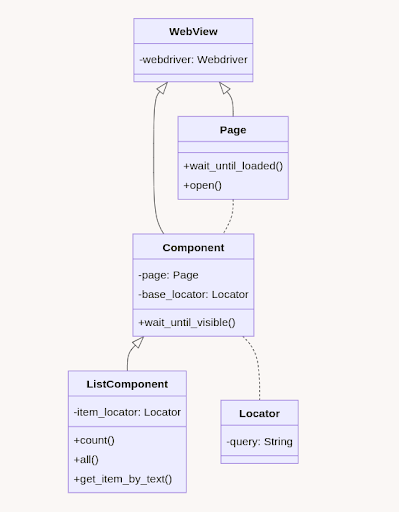
The first project we chose to develop automated tests included a number of complex components (logically related web elements). To make these easier to work with, we decomposed the page into a number of smaller classes. The page contains elements (simple HTML tags) and components (groups of HTML tags – dropdown, filter panel, etc.). Components can contain smaller sub-components and can be reused on several pages, which makes it easier to refactor the code in the future, and simplifies the page’s code.
We recently moved our basic implementation of the Page Object Model to the Open Source project – pomcorn. It can be used for automated tests, parsing, or any other automated work with the browser.
Pomcorn class diagram:
Locators: Making XPath Less Painful
To identify elements on the page, we developed a wrapper class named Locator for the locators provided by the Selenium XPath. We created the Locator wrapper class to avoid having to specify the locator strategy used each time and to reduce the amount of raw XPath used. Some autotest guides recommend avoiding XPath (ie: Playwright). However, we found it is more flexible since it allows us to easily create nested locators (for this, we implemented the “/” and “//” operators). This is especially useful when the page contains a component with a list of complex subcomponents.
For example, the posts panel on our website saritasa.com:

However, it consists of many child elements – posts. And to find a specific post item, we can extend the path:
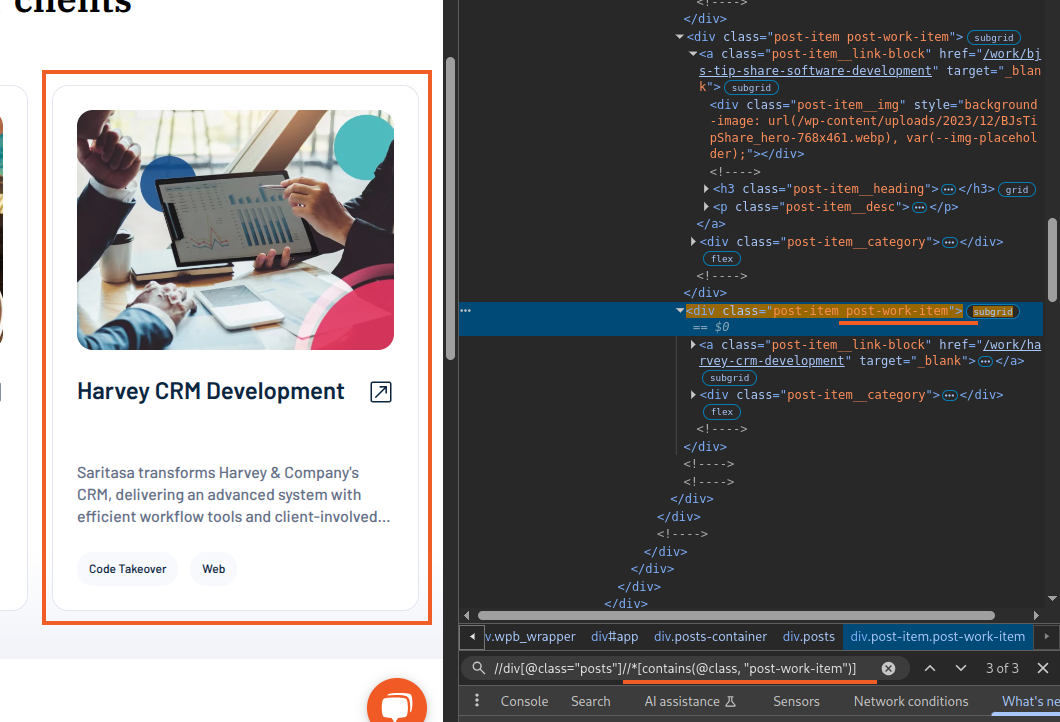
This is how the Locator classes we developed work. The element described above can be obtained using the following code:
from pomcorn import locators
from selenium import webdriver

chrome = webdriver.Chrome()
chrome.get("https://www.saritasa.com/work/type-code-takeover")

posts_list_locator = locators.ClassLocator(class_name=”posts”', exact=True)
post_locator = posts_list_locator / locators.ClassLocator(”post-work-item”)

chrome.find_element(*post_locator)
Component and element classes use locators to locate the parts of the interface they represent. So, a “posts list” component might look like this:
from pomcorn import ListComponent, locators, Page
class Post(Component[Page]):...
   @property
   def title(self) -> str: …

   def open(self) -> PostDetailsPage: ...
class PostsList(ListComponent[Post, Page]):
   base_locator = locators.ClassLocator(class_name=”posts”', exact=True)
   relative_item_locator = locators.ClassLocator(”post-work-item”)
PostsList is a component that allows us to work with a number of smaller components – Posts. This approach allows us to represent what we see on the site as locator-based python classes.
SDK and Preparing Data
When writing tests, we try to follow the Arrange Act Assert pattern. Often, the Assert step involves preparing data on the backend using the API. To abstract work with low-level http requests and their results, it is best to use a wrapper to convert data structures into higher-level objects. We decided to automatically generate the SDK based on the Swagger specification we had so as not to waste time on template code.
We settled on openapi-python-client for an SDK generator since, unlike Swagger Generator and other similar generators, it is tailored for Python and supports typing in auto-generated code.
To avoid copy-pasting the same code over and over again, we placed calls to SDK methods for creating and deleting objects in function-based factories. We saw a number of advantages in this approach, and based on this, we would not recommend even looking at a regular factory boy:
- Auto-suggestions for mandatory arguments;
- Type hints;
- Explicit teardowns — we return the created object via yield, and after the test is completed, a request is made to delete this object.
The final key component of data pre-preparation is fixtures. We use fixtures for all data pre-preparation:
- Creating/deleting unnecessary/editing objects
- Pre-configuring the system via API
- Opening the required page
- Obtaining environment variables
We also often use the parameterization feature built into pytest, which allows us to avoid duplicating code for similar tests by defining groups of parameters for which the test will be executed.
Test creation process
Let us take a look at our workflow for writing autotests using an example. You can find a detailed tutorial on starting autotests in the documentation for our pomcorn library.
Webdriver
Before you start writing tests, you need to choose and configure browsers/webdrivers. You can read about webdriver settings here. In our projects, we use an approach similar to the browser instance getter from pytest-splinter. In this article, we will use the Chrome() webdriver provided by Selenium as our example.
To create a webdriver fixture that will open a browser, navigate to the web application we are testing, and log in to it:
from selenium import webdriver as selenium_webdrver
from selenium.webdriver.remote.webdriver import WebDriver
from openapi_sdk import models
import pytest
from api_factories import utils
from pages.auth.sign_in_page import SignInPage

@pytest.fixture(scope="session")
def admin_webdriver(session_admin: models.User) -> WebDriver:
   """Initialize webdriver for logged-in admin session."""
   webdriver = selenium_webdrver.Chrome()
   email = session_admin.email
   password = utils.get_user_password(email)
   sign_in_page = SignInPage.open(webdriver)
   sign_in_page.sign_in(email=email, password=password)
   return webdriver
We should point out that we made this fixture session-based (scope=”session”), i.e. the browser can be opened only once during the entire test session. Some guides strictly insist that tests should be maximally isolated and a new browser should be used for each test. This approach avoids the influence of one test on another. However, this approach offers poor performance because each test has to wait for a new browser to open and to log in to the site. We decided that a session browser is a simple and safe way to speed up the tests. The issue of one test affecting another can be resolved by building the correct architecture of tests and teardowns in fixtures that pre-prepare data, change application or browser settings.
Page: Interacting with the Browser
After defining the webdriver, we create a page class that defines all the methods, components, and properties needed for the test. For example, let’s look at the authorization page class of one of our projects:
from __future__ import annotations
from pomcorn import locators
from pages.base_page import Page
from pages.auth.forms.login_form import LoginForm

class LoginPage(Page):
    def check_page_is_loaded(self) -> bool:
       return self.init_element(
           locator=locators.ElementWithTextLocator("Sign In"),
       ).is_displayed

    @property
    def login_form(self) -> LoginForm:
       return LoginForm(
           page=self,
           base_locator=locators.ClassLocator("auth-form"),
       )

    def login(self, email: str, password: str):
       return self.login_form.login(email=email, password=password)
Let’s see what’s defined here: The check_page_is_loaded method is responsible for checking whether the page is fully loaded. Here we define the condition by which we will consider the page fully loaded. In this case, it is displaying an element with the text “Sign In”.
This method is used in the base Page class from our pomcorn package, in the wait_until_loaded method called during object initialization, which, as the name suggests, waits for the page to fully load. You have to be sure that when accessing the page object, it will definitely be loaded. This eliminates errors that could occur due to the fact that some part of the page has not had time to load.
The base Page class also implements other methods that are inherent in all pages. For example, open and refresh.
The login_form property returns the LoginForm component to us, representing a group of elements that make up the login form (email and password fields, login button), and also implementing methods for interacting with them. You can read more about the components here.
The login method is a shortcut for the authorization form, calling the login method, which fills in the email and password fields, and then clicks the login button.
We recommend using fixtures to open pages. This approach allows you to reduce the test body, reuse the fixture in the future, and determine when listing fixtures at what point in the data preparation this page should be opened. Example below:
import pytest
from selenium.webdriver.remote.webdriver import WebDriver
from pages.auth.login_page import LoginPage

@pytest.fixture
def login_page(admin_webdriver: WebDriver) -> LoginPage:
    """Open login page and return instance of it."""
    return LoginPage.open(admin_webdriver)
Writing the Test
With all the preparations done, we can take a final look at the test case…
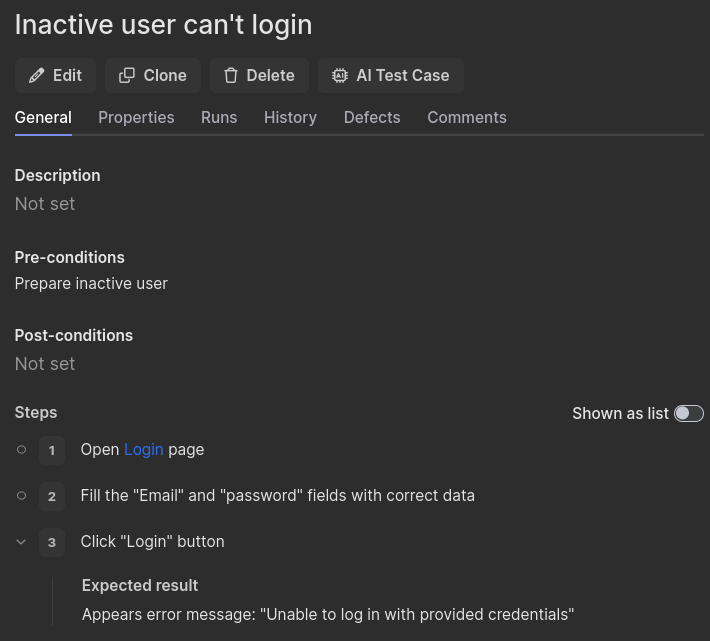
… and write a concise and readable test:
def test_sign_in_inactive_user(
   inactive_user: sdk_models.User,
   login_page: LoginPage,
):
   login_page.login(
       email=inactive_user.email,
       password=utils.get_user_password(inactive_user.email),
   )
   login_page.unable_to_log_in_msg.wait_until_visible()
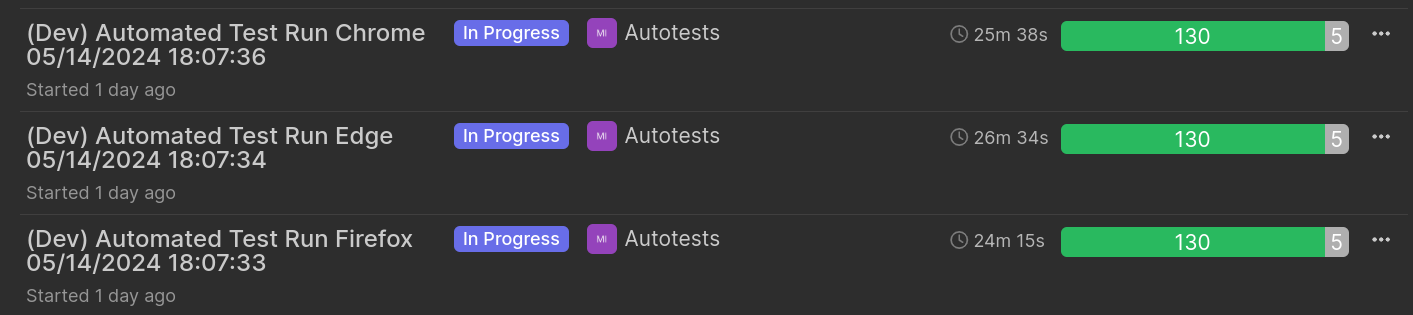
The final step is to mark the test with a link to the test case in Qase.io. For this, we use the pytest-qaseio plugin we developed.
@pytest.mark.qase("https://app.qase.io/case/DEMO-11")
def test_sign_in_inactive_user(
   inactive_user: sdk_models.User,
   login_page: LoginPage,
):
   login_page.login(
       email=inactive_user.email,
       password=utils.get_user_password(inactive_user.email),
   )
   login_page.unable_to_log_in_msg.wait_until_visible()
Using the plugin, we can save the results of running automated test cases in Qase.io :
Conclusion
We hope that you have found this article interesting and useful. For the sake of brevity, we omitted a lot of nuances associated with developing automated tests, such as:
- Optimization
- Caching
- Fighting flaky tests
- Organizing CI/CD
- Pre-preparing related objects
- Other fun stuff
We plan to post more in the future to share some ways we have come up with to deal with these issues. Hopefully, we have helped you by sharing our process and enabled you to learn more from our process and experience.