
Building 3D Web Applications with Babylon.js and Angular: Lessons from a Golf AR Project
Raise your hand if you knew you could use JavaScript to create full-fledged 3D apps, complete with AR and VR support, right in the browser?
Most beginners are surprised to learn how far the web has come in terms of 3D graphics and real-world game development.
In this article, you’ll learn:
What tools and frameworks are needed to enter the world of Web-3D and AR applications;
How to connect an Angular interface to a 3D scene to make the app feel unified;
What challenges developers face when creating a true 3D application;
What optimizations can dramatically increase performance?
Our test project is Golf AR. It’s a small game where the user’s goal is simple: hit the ball into the hole. But for us, it wasn’t so much about the game itself as it was about exploring the real-world challenges a developer faces when creating an interactive 3D app in the browser: working with physics, camera control, lighting, event synchronization, and UI integration.
We won’t go into detail about how to build a 3D app in the browser from scratch — there are already dozens of good articles and courses on this topic. Here, we’ll share our practical development experience, discuss real-world challenges, and explore solutions using our project as an example.
Since the project covers several distinct areas, we’ve decided to split the material into two parts. In this first article, we’ll focus exclusively on the 3D portion of the project: architecture, performance, physics, and the integration of the 3D scene with the UI. In the second, we’ll detail some of the limitations associated with AR and the practical solutions we found during development.
- The Idea and Tech Stack
- Why We Got Interested in Web 3D
- Selecting Tools
- Why Angular?
- Advantages and Limitations of 3D on the Web
- Main Disadvantages
- But the main advantage outweighs all this.
- A brief Introduction to 3D
- Performance Issues and their solutions
- Light and Shadows
- Light baking
- Physics in the 3D World
- Switching to Havok
- Optimizing Physics Shapes
- Optimizing Loading and Models
- Reducing the size of Babylon.js bundles
- Optimizing 3D Models
- Loading Management via a User Flow
- Challenges We Encountered
- When the contact area is almost zero
- Using Inertia and Damping
- Data exchange and display issues
- Angular and Babylon.js Integration
- Scene Initialization
- Scene Service
- Scene Implementation
- UI Interaction
- Conclusion
- Second camera
- Initial Concept
- Performance Issues
- Separating the implementation
- Final Solution
- Conclusion
The Idea and Tech Stack
Why We Got Interested in Web 3D
Browser 3D is an emerging field that is developing rapidly due to WebGL and WebGPU. Today, the web already allows you to create:
- Visualizations of objects and mechanisms
- Educational and scientific models
- Architectural scenes
- Medical and scientific models
- AR and VR experiences
- Interactive presentations and, of course, games
The user doesn’t have to install an app—everything works right in the browser.
This was the primary reason for the interest: to evaluate how prepared the web is for developing realistic, interactive 3D applications.
Selecting Tools
When it comes to 3D in the browser, two engines are most often considered: Three.js and Babylon.js.
Both options are being actively developed and are suitable for serious projects; however, we decided to choose Babylon.js.
The reasons:
- full TypeScript support
- more user-friendly and simple API at launch
- easily integrated with Angular
Why Angular?
At the time of development, Angular was the main framework used in our company.
Although Angular and 3D may not seem like the most obvious combination, in practice, it turned out to be convenient for development:
- Angular handled the user interface, application state, and user scenario management
- Babylon.js handled the 3D scene: rendering, cameras, physics, animations, and object interactions
- Communication between them was built through services and reactive streams. This allowed us to isolate the 3D logic from the UI and avoid a rigid bond between layers
The result was a clear and maintainable architecture.
Advantages and Limitations of 3D on the Web
Before diving into development, we evaluated the chosen technology and identified its strengths and weaknesses. Understanding these features is important for properly building the application architecture and anticipating potential challenges.
Main Disadvantages
Performance is lower than native engines – The browser is a general-purpose environment that was not originally designed for high-load 3D scenarios. Because of this:
- code runs on top of the browser engine and JavaScript runtime;
- access to the GPU and memory is limited;
- performance is noticeably lower than that of native applications.
Hardware and system access restrictions – It’s more difficult to fully utilize the following features in a browser:
- with the camera;
- with device sensors (gyroscope, GPS);
- with low-level access to the GPU.
While access to such features is present in the browser, in practice, it is limited by security requirements, the permissions system, and implementation differences between browsers.
Complex graphic effects require optimization, such as post-processing and realistic shadows.
If everything is done “like in an AAA engine,” the browser simply won’t cope,you have to find a balance.
It’s important to note: the bottleneck here isn’t JavaScript, but the browser environment itself. If the app is opened on a mobile device, the limitations of the device itself also play a role. A weaker processor, less available memory, and limited GPU performance will slow things down.
But the main advantage outweighs all this.
The user doesn’t have to install anything—just click on a link or open a website via a QR code, and within seconds, they’re enjoying a full 3D experience.
A brief Introduction to 3D
To make the rest of this article easier to read, let’s quickly go over the basic components of a 3D scene.
- Scene is the entire scene, our virtual world, where objects, lights, cameras, and physics reside.
- Engine is responsible for rendering the scene and updating objects.
- Camera defines the user’s perspective on the scene.
- Light represents light sources. Without lighting, objects appear flat and dark. It is light and shadows that allow us to see the shape of objects, their volume, and create a sense of realism in the scene.
- Physics handles object behavior, including forces, collisions, friction, gravity, and everything that makes the world feel alive.
- Meshes are the 3D objects themselves in the scene. They can be anything from simple cubes to complex models.
- Material and Texture are the outer shell of objects. Material determines how an object reacts to light, while Texture defines its “skin”: color, images, and video.
- Animation and Skeleton are responsible for the movement and skeletal animation of models.
There are other components, but these are the main ones that developers encounter most often.
Performance Issues and their solutions
In 3D, and especially in the browser, performance is a major issue. Even on powerful devices, the browser imposes additional limitations, so a scene that performs well in a native engine may perform significantly worse on the web. This issue is even more pronounced on mobile devices. A phone’s resources (processor, memory, power consumption) are significantly inferior to those of a desktop computer.
As a result, a scene that might run smoothly in a native app or on a PC often requires significant optimization in a mobile browser; otherwise, FPS will drop, the device may overheat, and the battery will be rapidly drained.
Light and Shadows
Light and shadows are among the most resource-intensive elements of a 3D scene. Each light source requires additional calculations. Dynamic shadows create additional overhead,the engine must separately calculate which objects cast the shadow and how the shadow should appear.
In small scenes, this is almost unnoticeable, but as more objects appear, the lighting begins to directly impact performance and FPS.
Light baking
One of the most effective methods for optimizing lighting and shadows is light baking, which is what we used.
The essence of this approach is that lighting is calculated in advance in a 3D editor (such as Blender or 3ds Max), and the result is saved directly in the object’s texture. For the engine, this is no longer dynamic lighting, but a material with pre-calculated lighting and shadows.
To use this approach in Babylon.js, you need to disable lighting calculations for materials and set the texture to self-illuminating:
const material = mesh.material;
material.emissiveColor = Color3.White();
material.emissiveTexture = material.albedoTexture;
material.disableLighting = true;
After this, the engine displays the finished result, without any additional calculations.
This method is suitable if your project:
- does not involve dynamic lighting changes (e.g., day/night cycles)
- realistic shadows are not critical
- the scene is mostly static
Depending on the number of objects, light sources, and scene complexity, the performance gain can range from a few percent to multiple values.
In our case, this turned out to be one of the simplest and most effective optimization methods. The scene became noticeably more stable, and the FPS increased and stopped dropping when the camera and objects moved.
Physics in the 3D World
Physics adds significant computational overhead and quickly becomes a bottleneck as the scene complexity increases. It is responsible for collisions, object movement, friction, and overall scene behavior.
At the start of Golf AR development, the Cannon engine was chosen for physics. Initially, it was completely satisfactory, the scene was simple, there were few objects, and performance remained stable.
Problems arose after adding a new course with a large number of physics objects.The scene began to lag and behave unstable. This behavior was unsatisfactory, and it became clear that we needed to find a solution to the emerging performance issues.
Switching to Havok
Around the same time, the Babylon.js team announced the integration of the Havok physics engine. Demos showed significant performance gains depending on the scene.
We studied the demo, looked at the API, and decided to replace Cannon with Havok.
The results were immediately noticeable:
- FPS increased severalfold,
- jitters disappeared,
- the scene became stable even with a large number of objects.
Optimizing Physics Shapes
There’s a simple and very effective way to reduce the load on physics: using different types of physics shapes.
If the physical body doesn’t have to exactly replicate the object’s shape, you can use simpler representations, such as PhysicsShapeType.CONVEX_HULL, which is a simplified “hull” of the object that replicates its general outline without fine details or indentations.
Why is this necessary?
The simpler the shape of the physical body, the fewer calculations are required for collision calculations. In 3D, all objects are composed of polygons—flat triangular faces. The fewer triangles used for physics calculations, the lower the processor load.
In the Golf AR project, we use two types of physics shapes:
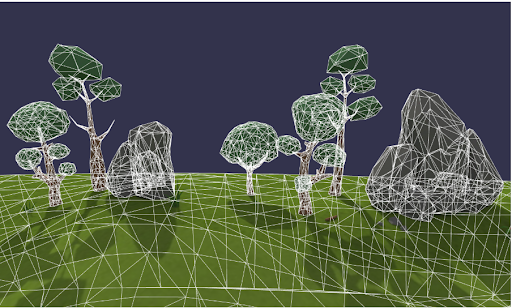
- PhysicsShapeType.MESH—a physical shape that completely replicates the object’s geometry.
We use it for field surfaces where precision is important.
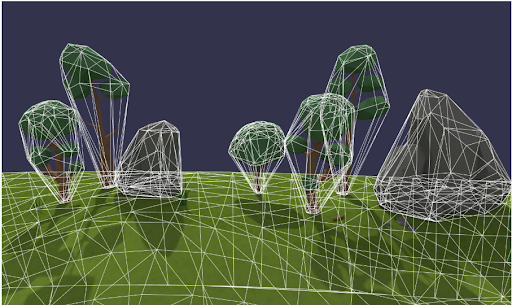
- PhysicsShapeType.CONVEX_HULL is a simplified shape that only conveys the general outline of an object.
It is used for trees, rocks, and other minor objects.
Using PhysicsShapeType.MESH
Using PhysicsShapeType.CONVEX_HULL
Sample code:
const physicsAggregate = new PhysicsAggregate(
  mesh,
  isFieldSurface ? PhysicsShapeType.MESH : PhysicsShapeType.CONVEX_HULL,
  { mass: 0, restitution: 0.25 },
);
This provided a performance boost without complicating the logic or significantly impacting the user experience.
Optimizing Loading and Models
During development, we noticed that the website was taking too long to load.
On average, the initial load on mobile devices using a mobile data network took about 1 minute, which is unacceptable. Few people are willing to wait that long.
Opening DevTools → Network, we noticed two main issues:
- The Babylon.js bundles were large,
- 3D models were taking up a significant portion of the traffic.
Reducing the size of Babylon.js bundles
The first step was optimizing the bundles themselves.
By default, Babylon.js can be imported “in its entirety,” which is convenient at the start, but it leads to unnecessary code in the build.
After a quick study of the documentation, we learned that using targeted imports can significantly reduce the bundle size by including only the modules that are actually used.
It used to be like this:
import { Engine, Scene, Vector3, HavokPlugin, IDisposable } from '@babylonjs/core';
It became like this:
import { Engine } from '@babylonjs/core/Engines/engine';
import { Scene, type IDisposable } from '@babylonjs/core/scene';
import { Vector3 } from '@babylonjs/core/Maths/math.vector';
import { HavokPlugin } from '@babylonjs/core/Physics/v2/Plugins/havokPlugin';
This step significantly reduced the final bundle size by approximately 30 MB, down to just 5 MB, while the application logic remained unchanged.
Optimizing 3D Models
The next challenge was the size of the models themselves.
We tried various optimization methods for the models and first consulted with a 3D designer. His edits had a modest effect,the models were already quite well optimized. Gradually, we realized that high detail isn’t always necessary. For example, we replaced the golf ball model with a simple sphere created using Babylon.js. The difference was virtually imperceptible to the human eye, but we managed to save about 1.3 MB by deleting the original model.
Loading Management via a User Flow
In parallel with optimizations, we decided to rethink the loading flow itself. The project was planned to include a tutorial, which allowed us to intelligently distribute resource loading. Ultimately, the user flow looked like this:
- Loading the main bundles required for the site to function
- Welcome page – at this point, background loading of models begins
- Tutorial – the user learns the mechanics
- Game scene – by this point, all models are usually already loaded
This approach allowed us to:
- hide the long loading process,
- improve the first impression,
- reduce the likelihood that users would simply leave the site.
Challenges We Encountered
While developing the project, adding new mechanics, and refining the UX, we ran into plenty of hurdles. We had to figure things out on our own,sometimes relying on quick workarounds, but ultimately finding solutions that worked.
When the contact area is almost zero
At some point, we noticed the ball was behaving strangely. It was moving the same way in different parts of the field, even though the surface was visually different.
Intuitively, this didn’t seem right. In real life:
- a ball in sand is harder to move,
- it rolls more slowly in tall grass,
- and on a flat surface it rolls faster and further.
To add realism, we decided to implement two mechanics:
- Friction – to vary the speed of the ball’s roll in different parts of the field.
- Variable impact force – depending on the surface the ball is on at the moment of impact.
When attempting to add friction, we encountered an unexpected problem. Due to the very small contact area between the ball and the surface, the standard friction coefficient did not produce a noticeable effect – even with higher values, the ball speed was unchanged. This prompted us to delve deeper into the physical properties of the ball.
Using Inertia and Damping
While studying the PhysicsBody API, we noticed two parameters: inertia and damping.
- Inertia controls the resistance to rotation around the axes.
By increasing this parameter, we reduced the ball’s ability to spin for long periods, causing it to lose rolling speed more quickly.
- Damping controls the decay of motion, that is, how quickly an object loses energy over time.
It’s important to note that damping affects not only the ball’s movement after impact but also the force of the impact itself.
Thanks to damping, we were able to naturally reduce the force of impact on highly resistant surfaces, (such as sand or tall grass) without introducing any additional logic. The ball simply received less energy and stopped faster, which looked realistic and predictable.
Results:
- Inertia was used to control the speed of rotation and roll of the ball.
- Damping was used to simulate energy loss and impact attenuation on different surface types.
This approach allowed us to achieve realistic ball behavior without complicating the mechanics or introducing unnecessary calculations.
Data exchange and display issues
Angular and Babylon.js Integration
In this project, Babylon.js and Angular are integrated using services and a component-based approach. Angular is responsible for the UI, state, and lifecycle of the application, while Babylon.js is responsible for rendering and updating the 3D scene. It was important to structure their interactions so that they do not interfere with each other.
The basic idea of the architecture was simple: Angular manages the application, Babylon manages the scene.
Scene Initialization
The Angular component does not create the scene directly. Its job is to prepare the <canvas> and pass a reference to it to the service. All initialization occurs through SceneService, not within the component.
The component remains as lightweight as possible: it knows when the scene needs to be created or destroyed, but does not know how it is structured internally.
@ViewChild('canvas')
public canvas: ElementRef<HTMLCanvasElement> | null = null;

private readonly sceneService = inject(SceneService);

ngAfterViewInit(): void {
  this.zone.runOutsideAngular(() => {
    this.sceneService.initialize(this.canvas.nativeElement);
  });
}
public ngOnDestroy(): void {
  this.sceneService.disposeScene();
}
Scene Service
All logic related to Babylon.js is encapsulated in SceneService. It is it that:
- creates a scene instance;
- stores a reference to the current scene;
- manages its state;
- provides reactive state streams for the Angular application.
The service acts as a link between the UI and the 3D world, keeping Angular and Babylon.js code separate.
public initialize(element: HTMLCanvasElement): void {
  const scene = new BaseScene(element);
  this.scene$.next(scene);
}
Scene Implementation
A separate scene class is responsible exclusively for 3D:
- creating the engine and scene;
- setting up the camera, lighting, and objects;
- running the render loop;
- working with physics and animations;
- etc.
export class BaseScene implements IDisposable {
  public constructor(private readonly canvas: HTMLCanvasElement) {
    this.engine = new Engine(this.canvas);
    this.scene = new Scene(this.engine);
    this.golfBall = new GolfBall(this.scene);

    // ... creating a camera, light, field objects, etc.

    this.gameManager = new GameManager(
      this.golfBall,
      this.scene,
      ...
    );
    this.engine.runRenderLoop(() => this.scene.render());
  }
}
Angular doesn’t interact directly with this class—all communication goes through the service.
UI Interaction
We used a reactive approach to communicate between the UI and 3D. The scene service provides state streams to which Angular components can subscribe. This allows, for example, to indicate scene loading or block the interface until the scene is fully initialized.
public readonly isLoading$ = this.scene$.pipe(
  filterNull(),
  switchMap(scene => scene.gameManager.isLoading$),
);
Conclusion
This approach allowed us to avoid code chaos and clearly separate responsibilities:
Angular manages the app and UI, Babylon.js manages the 3D scene, and the service connects them. This simplified support, debugging, and further development of the project.
Second camera
We decided to add a second camera to track the ball. The golf course ended up being quite large, and the ball itself was very small in comparison. As a result, it was difficult for the player to quickly understand where the ball was, especially after hitting it.
To improve the user experience, we decided to add a ball-tracking camera. This made the on-screen action more dynamic and visual: the player could see not only the shot itself, but also the subsequent movement of the ball.
Initial Concept
We initially envisioned the following scenario. After the player hits the ball, a block appears at the top of the screen:
- first, it plays a short video of the golfer hitting the ball;
- then the flight of the ball itself is shown, using a second camera;
- after the ball comes to rest, the block disappears.
It was important that the video and the image from the second camera be perceived as a single video sequence, without visual discontinuities.
Performance Issues
The camera image could only be rendered on the Babylon.js side, so the first solution was to use VideoTexture. The video and camera image were rendered within a single GUI.Rectangle, which visually solved the problem.
However, on mobile devices, performance issues arose almost immediately. FPS dropped noticeably, and stuttering appeared, significantly affecting the gameplay experience. The cause turned out to be that rendering the video in a 3D scene was too heavy for phones.
Separating the implementation
Our next step was to separate the tasks:
- the video played on the Angular side;
- the image from the second camera played on the Babylon.js side.
However, another challenge arose: synchronization and sizing. Essentially, we ended up with two independent blocks that were difficult to visually align perfectly, especially on different devices and resolutions.
Final Solution
In the end, we adopted a simpler and more reliable solution: replacing the video with animation. By that point, the golfer was already on stage, showing an animation of his swing. Therefore, we immediately showed the image from the second camera, which showed both the swing animation and the subsequent flight of the ball.
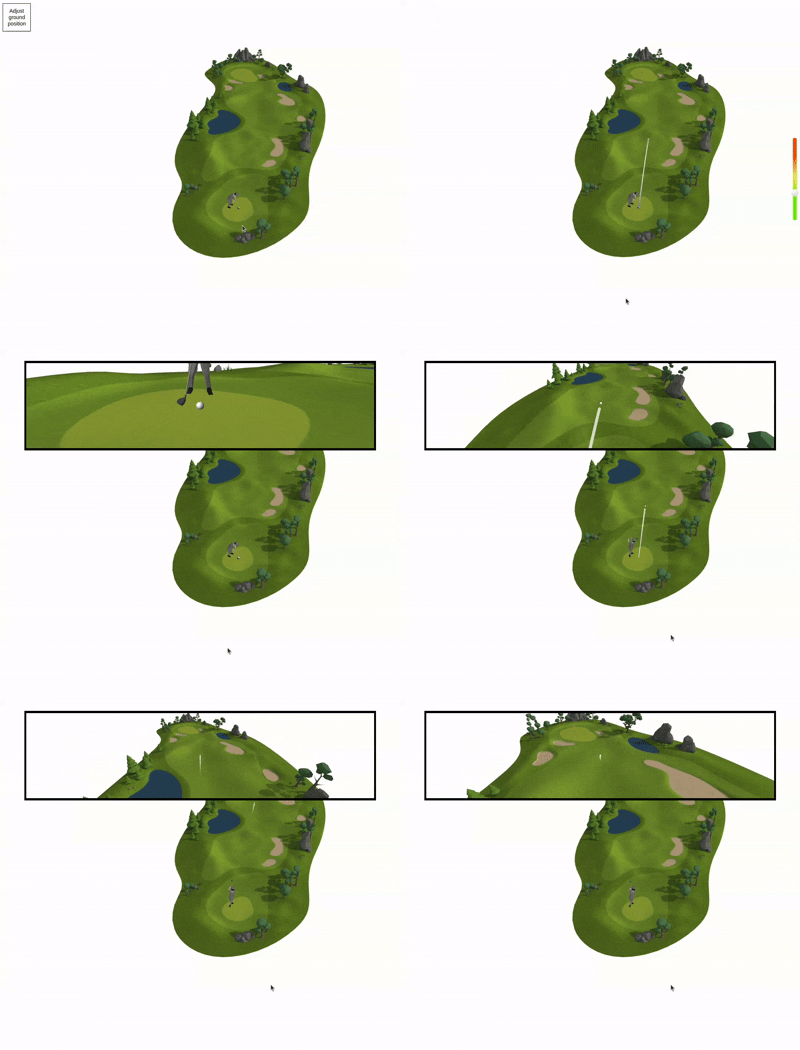
This solution turned out to be:
- simpler to implement;
- more stable on mobile devices;
- and visually sufficient for the desired level of immersion.
Sometimes foregoing a more “spectacular” solution in favor of stability and performance is the best choice, especially on the web and AR.
Conclusion
The Golf AR project is still in development. We have many ideas: what can be improved in architecture, where to optimize, and what functionality to add next. This was our first experience working with 3D in JavaScript, and, as often happens, at the start, we didn’t account for many nuances.
Some problems were fixed during development, and some became noticeable only over time. As the project evolved and grew in complexity, the code required refactoring. This experience allowed us to better understand how to structure architecture and optimize 3D applications on the web.
During our work on the project, there were many challenges, errors, and a lot of effort and time spent. But it wasn’t in vain. We gained valuable practical experience, thought through Angular and Babylon.js interaction inside a single application, and learned how to work with 3D models and browser physics.
This article was written to introduce you to the relatively young but rapidly developing Web-3D technology using Golf AR as an example. Yes, we mostly talked about difficulties we faced, but through them, we wanted to show how much can already be done on the web today and how long a path this technology still has ahead.
Therefore, if you are interested in 3D or just want to try something new — don’t be afraid to experiment. Jump onto this fast-moving train with us and dive into the world of Web-3D.
In the next article, we’ll delve deeper into AR, explain what pitfalls await there, and share practical solutions that allow us to create a vibrant and interactive 3D-AR space. You’ll learn how we handled browser and mobile device limitations, and what approaches helped us make the experience smooth and realistic.